
Excire Foto is an intelligent image management program with which you can finally bring order back to large image archives. However, there are three things you should bear in mind when starting out, which are described in this article.
You can also find a video below the article in which I explain the tips directly on the screen.
Tip 1: Move the default Excire Foto database or create your own
Excire Foto (version 1.3) automatically creates a standard database on the local hard disk during installation and begins to store thumbnails and larger preview images there in addition to keywords. Depending on the size of the image archive, this can quickly add up to several gigabytes.
Some users are surprised (or annoyed) when the hard disk eventually reports that it is full.
It is still possible to move the database to another hard disk, but it is more elegant to choose a location that has enough storage space and is easier to keep an eye on than a rather hidden program directory.
I don’t want to hide the fact that a fast internal hard disk, preferably an SSD, makes Excire Photo particularly fast, even during subsequent searches. However, if you don’t have this available, you can also use a fast external hard disk for the database. But not necessarily via the network. This could be too slow.
If you would like to outsource your database after all, you can find instructions on how to do this in the Excire forum.
 The other option, which I prefer, is not to use the default database at all – then it doesn’t take up any disk space and you can ignore its existence – and instead create a new, empty database in a folder of your choice.
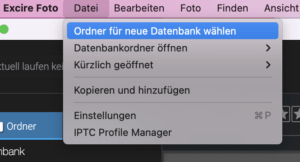
This is done quickly via the file menu. Click on File -> Select folder for new database, select a folder, restart Excire, done.
Then you can start adding the photos, which brings us to the next tip.
Tip 2: Add photos bit by bit and don’t import them all into Excire Foto at once
With a new program, it’s easy to be tempted to add all the photos in one go and then see what happens. This can be quite a time-consuming idea with Excire Foto. Excire can handle very large image collections. But reading them in can take quite a while. This is because Excire Foto analyzes the photos immediately and automatically assigns keywords that describe the content of the image.
It’s a good idea to test how long this takes on your home computer first. After all, not everyone has the latest high-end computer with lightning-fast drives at home. And since Excire Foto also analyzes raw files, they may be quite large and bulky for the analysis.
So: When you click on the Add button, first select a smaller directory with perhaps a few hundred photos. Let Excire Foto add them and see how long it takes. Excire Foto stops the time itself and displays it in a window at the end. From there you can decide in which stages you want to proceed.
Tip 3: Always have Excire Foto generate previews as long as the hard disks with the photos are connected!
 Excire Foto automatically creates thumbnails in a smaller resolution than the original when you add photos, unless you switch it off. If you do not do this, but the photos are no longer accessible later, for example because the external hard disk is not connected, Excire Foto uses the thumbnail for the preview. And this then looks pixelated and blurred. This is not a program error, but an emergency strategy when previews are missing. You can also create them afterwards. But you first have to figure out what could be causing the blurred previews. And the trouble can be avoided.
If you would like to see the tips again in video form, click on the following video. I explain the three tips and show you directly on screen what you need to look out for in Excire Foto.
If you like the video, please subscribe to the channel, activate the notifications in YouTube and you will automatically be notified when there are new videos.
Leave A Comment